
- One in the base-system with a stack of local patches.
- One in pkgsrc with mostly build fix patches.
The base-system version of GDB (GPLv3) still relies on a set of local patches. I set a goal to reduce the local patches to bare minimum, ideally reaching no local modifications at all.
GDB changes
I've written an integration of GDB with fork(2) and vfork(2) events. Unfortunately, this support (present in a local copy of GDB in the base-system) had not been merged so far, because there is a generic kernel regression with the pg_jobc variable. This variable can be called a reference counter of the number of processes within a process group that has a parent with control over a terminal. The semantics of this variable are not very well defined and in the result the number can become negative. This unexpected state of pg_jobc resulted in spurious crashes during kernel fuzzing. As a result new kernel assertions checking for non-negative pg_jobc values were introduced in order to catch the anomalies quickly. GDB as a ptrace(2)-based application happened to reproduce negative pg_jobc values quickly and reliably and this stopped the further adoption of the fork(2) and vfork(2) patch in GDB, until the pg_jobc behavior is enhanced. I was planning to include support for posix_spawn(3) events as well, as they are implemented as a first-class operation through a syscall, however this is also blocked by the pg_jobc blocker.
A local patch for GDB is stored here for the time being.
I've enable multi-process mode in the NetBSD native target. This enabled proper support for multiple inferiors and ptrace(2) assisted management of the inferior processes and their threads.
    (gdb) info inferior
      Num  Description       Connection           Executable
    * 1    process 14952     1 (native)           /usr/bin/dig
      2    <null>            1 (native)
      3    process 25684     1 (native)           /bin/ls
      4    <null>            1 (native)           /bin/ls
Without this change, additional inferiors could be already added, but not properly controlled.
I've implemented the xfer_partial TARGET_OBJECT_SIGNAL_INFO support for NetBSD. NetBSD implements reading and overwriting siginfo_t received by the tracee. With TARGET_OBJECT_SIGNAL_INFO signal information can be examined and modified through the special variable $_siginfo. Currently NetBSD uses an identical siginfo type on all architectures, so there is no support for architecture-specific fields.
(gdb) b main
Breakpoint 1 at 0x71a0
(gdb) r
Starting program: /bin/ps

Breakpoint 1, 0x00000000002071a0 in main ()
(gdb) p $_siginfo
$1 = {si_pad = {5, 0, 0, 0, 1, 0 , 1, 0 }, _info = {_signo = 5,
    _code = 1, _errno = 0, _pad = 0, _reason = {_rt = {_pid = 0, _uid = 0, _value = {sival_int = 1,
          sival_ptr = 0x1}}, _child = {_pid = 0, _uid = 0, _status = 1, _utime = 0, _stime = 0},
      _fault = {_addr = 0x0, _trap = 1, _trap2 = 0, _trap3 = 0}, _poll = {_band = 0, _fd = 1},
      _syscall = {_sysnum = 0, _retval = {0, 1}, _error = 0, _args = {0, 0, 0, 0, 0, 0, 0, 0}},
      _ptrace_state = {_pe_report_event = 0, _option = {_pe_other_pid = 0, _pe_lwp = 0}}}}}
NetBSD, contrary to Linux and other BSDs, supports a ptrace(2) operation to generate a core(5) file from a running process. This operation is used in the base-system gcore(1) program. The gcore functionality is also delivered by GDB, and I have prepared new code for GDB to wire PT_DUMPCORE into the GDB code for NetBSD, and thus support GDB's gcore functionality. This patch is still waiting in upstream review. A local copy of the patch is here.
(gdb) r
Starting program: /bin/ps

Breakpoint 1, 0x00000000002071a0 in main ()
(gdb) gcore
Saved corefile core.4378
(gdb) !file core.4378
core.4378: ELF 64-bit LSB core file, x86-64, version 1 (SYSV), NetBSD-style, from 'ps', pid=4378, uid=1000, gid=100, nlwps=1, lwp=4378 (signal 5/code 1)
Plan for the next milestone
Rewrite the gdbserver support and submit upstream.
As a part of Google summer code 2020, I have been working on Enhance the Syzkaller support for NetBSD. This post summarises the work done in the past month.
For work done in the first coding period, you can take a look at the previous post.
Automation for enhancement
With an aim of increasing the number of syscalls fuzzed, we have decided to automate the addition of descriptions for syscalls as well as ioctl device drivers in a customised way for NetBSD.
Design
All the ioctl commands for a device driver in NetBSD are stored inside the /src/sys/dev/<driver_name>/
folder. The idea is to get information related to a particular ioctl command by extracting required information from the source code of drivers. To achieve the same, we have broken down our project into majorly three phases.
- Generating preprocessed files
- Extracting information required for generating descriptions
- Conversion to syzkaller’s grammar
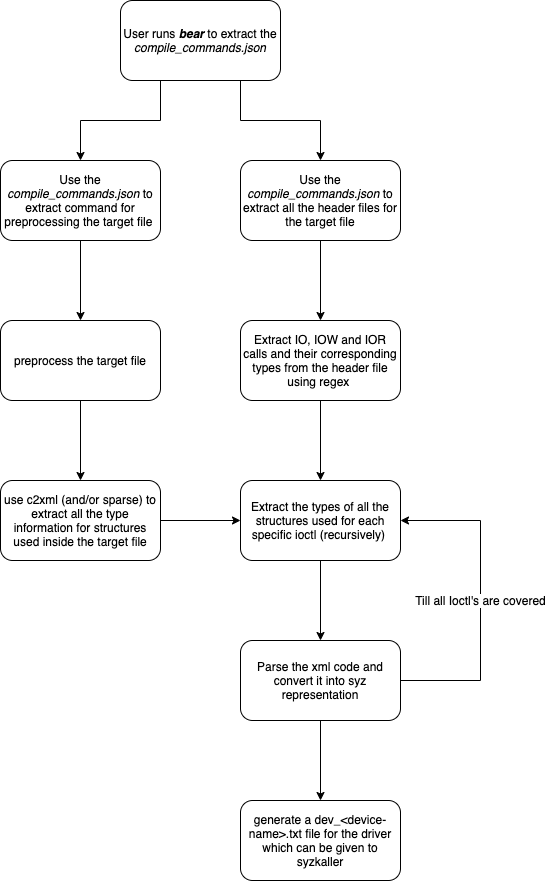
Generating Preprocessed files
For a given preprocessed file, c2xml tool outputs the preprocessed C code in xml format. Further, the intermediate xml format descriptions would help us to smoothly transform the c code to syzkaller specific descriptions, in the last stage of this tool. We have used Bear as an aid for fetching commands to preprocess files for a particular driver. Bear generates a file called compile_commands.json which stores the commands used for compiling a file in json format. We then run these commands with ‘-E’ gcc flag to fetch the preprocessed files.These preprocessed files then serve as an input to the c2xml program.
Extractor
Definition of ioctl calls defined in header files of device driver in NetBSD can be broken down to:

When we see it from syzkaller’s perspective, there are basically three significant parts we need to extract for adding description to syzkaller.
Description of a particular ioctl command acc to syzkaller’s grammar:
ioctl$FOOIOCTL(fd <fd_driver>, cmd const[FOOIOCTL], pt ptr[DIR, <ptr_type>])
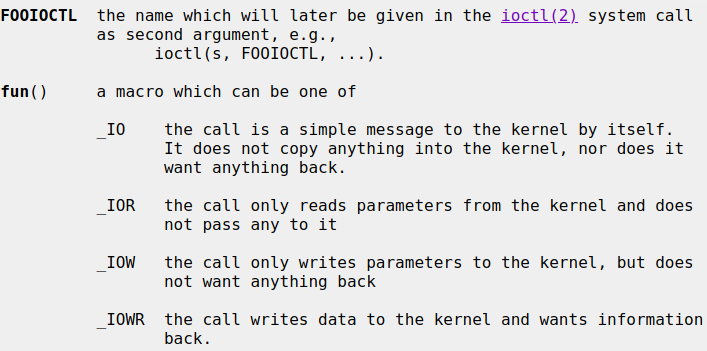

These definitions can be grepped from a device’s header files. The type information or description for pointer can then be extracted from the output files generated by c2xml. If the third argument is a struct, the direction of the pointer is determined with the help of fun() macros.
To-Do
The extracted descriptions have to be converted into syzkaller-friendly grammer. We plan to add support for syscalls too , which would ease the addition of complex compat syscalls. This would help us to increase the syzkaller’s coverage significantly.
Stats
Along with this, We have continued to add support for few more syscalls these include:- ksem(2) family
- mount(2) family
Atlast, I would like to thank my mentors - Cryo, Siddharth Muralee and Santhosh along with Kamil for their guidance and support. I am thankful to NetBSD community too along with Google for providing me such an amazing opportunity.
As a part of Google summer code 2020, I have been working on Enhance the Syzkaller support for NetBSD. This post summarises the work done in the past month.
For work done in the first coding period, you can take a look at the previous post.
Automation for enhancement
With an aim of increasing the number of syscalls fuzzed, we have decided to automate the addition of descriptions for syscalls as well as ioctl device drivers in a customised way for NetBSD.
Design
All the ioctl commands for a device driver in NetBSD are stored inside the /src/sys/dev/<driver_name>/
folder. The idea is to get information related to a particular ioctl command by extracting required information from the source code of drivers. To achieve the same, we have broken down our project into majorly three phases.
- Generating preprocessed files
- Extracting information required for generating descriptions
- Conversion to syzkaller’s grammar
Generating Preprocessed files
For a given preprocessed file, c2xml tool outputs the preprocessed C code in xml format. Further, the intermediate xml format descriptions would help us to smoothly transform the c code to syzkaller specific descriptions, in the last stage of this tool. We have used Bear as an aid for fetching commands to preprocess files for a particular driver. Bear generates a file called compile_commands.json which stores the commands used for compiling a file in json format. We then run these commands with ‘-E’ gcc flag to fetch the preprocessed files.These preprocessed files then serve as an input to the c2xml program.
Extractor
Definition of ioctl calls defined in header files of device driver in NetBSD can be broken down to:
When we see it from syzkaller’s perspective, there are basically three significant parts we need to extract for adding description to syzkaller.
Description of a particular ioctl command acc to syzkaller’s grammar:
ioctl$FOOIOCTL(fd <fd_driver>, cmd const[FOOIOCTL], pt ptr[DIR, <ptr_type>])
These definitions can be grepped from a device’s header files. The type information or description for pointer can then be extracted from the output files generated by c2xml. If the third argument is a struct, the direction of the pointer is determined with the help of fun() macros.
To-Do
The extracted descriptions have to be converted into syzkaller-friendly grammer. We plan to add support for syscalls too , which would ease the addition of complex compat syscalls. This would help us to increase the syzkaller’s coverage significantly.
Stats
Along with this, We have continued to add support for few more syscalls these include:- ksem(2) family
- mount(2) family
Atlast, I would like to thank my mentors - Cryo, Siddharth Muralee and Santhosh along with Kamil for their guidance and support. I am thankful to NetBSD community too along with Google for providing me such an amazing opportunity.
I have been working on Fuzzing Rumpkernel Syscalls. This blogpost details the work I have done during my second coding period.
Reproducing crash found in ioctl()
Kamil has worked on reproducing the following crash
Thread 1 "" received signal SIGSEGV, Segmentation fault.
pipe_ioctl (fp=<optimized out>, cmd=<optimized out>, data=0x7f7fffccd700)
    at /usr/src/lib/librump/../../sys/rump/../kern/sys_pipe.c:1108
warning: Source file is more recent than executable.
1108                            *(int *)data = pipe->pipe_buffer.cnt;
(gdb) bt
#0  pipe_ioctl (fp=<optimized out>, cmd=<optimized out>, data=0x7f7fffccd700)
    at /usr/src/lib/librump/../../sys/rump/../kern/sys_pipe.c:1108
#1  0x000075b0de65083f in sys_ioctl (l=<optimized out>, uap=0x7f7fffccd820, retval=<optimized out>)
    at /usr/src/lib/librump/../../sys/rump/../kern/sys_generic.c:671
#2  0x000075b0de6b8957 in sy_call (rval=0x7f7fffccd810, uap=0x7f7fffccd820, l=0x75b0de126500,
    sy=<optimized out>) at /usr/src/lib/librump/../../sys/rump/../sys/syscallvar.h:65
#3  sy_invoke (code=54, rval=0x7f7fffccd810, uap=0x7f7fffccd820, l=0x75b0de126500, sy=<optimized out>)
    at /usr/src/lib/librump/../../sys/rump/../sys/syscallvar.h:94
#4  rump_syscall (num=num@entry=54, data=data@entry=0x7f7fffccd820, dlen=dlen@entry=24,
    retval=retval@entry=0x7f7fffccd810)
    at /usr/src/lib/librump/../../sys/rump/librump/rumpkern/rump.c:769
#5  0x000075b0de6ad2ca in rump___sysimpl_ioctl (fd=<optimized out>, com=<optimized out>,
    data=<optimized out>) at /usr/src/lib/librump/../../sys/rump/librump/rumpkern/rump_syscalls.c:979
#6  0x0000000000400bf7 in main (argc=1, argv=0x7f7fffccd8c8) at test.c:15
in the rump using a fuzzer that uses pip2, dup2 and ioctl syscalls and specific arguments that are known to cause a crash upon which my work develops.
https://github.com/adityavardhanpadala/rumpsyscallfuzz/blob/master/honggfuzz/ioctl/ioctl_fuzz2.c
Since rump is a multithreaded process. Crash occurs in any of those threads. By using a core dump we can quickly investigate the crash and fetch the backtrace from gdb for verification however this is not viable in the long run as you would be loading your working directory with lots of core dumps which consume a lot of space. So we need a better way to reproduce crashes.
Crash Reproducers
Getting crash reproducers working took quite a while. If we look at HF_ITER() function in honggfuzz, it is a simple wrapper for HonggfuzzFetchData() to fetch buffer of fixed size from the fuzzer.
void HonggfuzzFetchData(const uint8_t** buf_ptr, size_t* len_ptr) {
.
.
.
.
    *buf_ptr = inputFile;
    *len_ptr = (size_t)rcvLen;
.
.
}
And if we observe the attribute we notice that inputFile is mmaped.
//libhfuzz/fetch.c:26
    if ((inputFile = mmap(NULL, _HF_INPUT_MAX_SIZE, PROT_READ, MAP_SHARED, _HF_INPUT_FD, 0)) ==
        MAP_FAILED) {
        PLOG_F("mmap(fd=%d, size=%zu) of the input file failed", _HF_INPUT_FD,
            (size_t)_HF_INPUT_MAX_SIZE);
    }
So in a similar approach HF_ITER() can be modified to read input from a file and be mmapped so that we can reuse the reproducers generated by honggfuzz.
Attempts have been made to use getchar(3) for fetching the buffer via STDIN but for some unknown reason it failed so we switched to mmap(2)
So we overload HF_ITER() function whenever we require to reproduce a crash. I chose the following approach to use the reproducers. So whenever we need to reproduce a crash we just define CRASH_REPR.
static
void Initialize(void)
{
#ifdef CRASH_REPR
    FILE *fp = fopen(argv[1], "r+");
    data = malloc(max_size);
    fread(data, max_size, 1, fp);
    fclose(fp);
#endif
    // Initialise the rumpkernel only once.
    if(rump_init() != 0)
        __builtin_trap();
}

#ifdef CRASH_REPR
void HF_ITER(uint8_t **buf, size_t *len) {
        *buf = (uint8_t *)data;
        *len = max_size;
        return;
}
#else
EXTERN void HF_ITER(uint8_t **buf, size_t *len);
#endif
This way we can easily reproduce crashes that we get and get the backtraces.
Generating C reproducers
Now the main goal is to create a c file which can reproduce the same crash occuring due to the reproducer. This is done by writing all the syscall executions to a file with arguments so they can directly be compiled and used.
#ifdef CRASH_REPR
        FILE *fp = fopen("/tmp/repro.c","a+");
        fprintf(fp, "rump_sys_ioctl(%" PRIu8 ", %" PRIu64 ");\n",get_u8(),get_ioctl_request());
        fclose(fp);
#else
        rump_sys_ioctl(get_u8(), get_ioctl_request());
#endif
I followed the same above method for all the syscalls that are executed. So I get a proper order of syscalls executed in native c code that I can simply reuse.
Obstacles
The number of times each syscall is executed before getting to a crash is quite high. So trying to perform a write to a file or STDOUT will create a lot of overhead when the number of syscalls executed are quite high. This method is good enough but a bit of optimization will make it even better.
To-Do
- ./build.sh building rump on linux+netbsd
- pregenerating fuzzer input using the implementation similar to that used in syzkaller.
Finally I thank my mentors Siddharth Muralee, Maciej Grochowski, Christos Zoulas for their guidance and Kamil Rytarowski for his constant support whenever I needed it.
My GSoC project under NetBSD involves the development of test framework of curses library. This blog report is second in series of blog reports; you can have a look at the first report. This report would cover the progress made in second coding phase along with providing some insights into the libcurses.
Complex characters
A complex character is a set of associated character, which may include a spacing character and non-spacing characters associated with it. Typical effects of non-spacing character on associated complex character c include: modifying the appearance of c (like adding diacritical marks) or bridge c with the following character. The cchar_t data type represents a complex character and its rendition. In NetBSD, this data type has following structure:
struct cchar_t {
	attr_t attributes; /* character attributes */
	unsigned elements; /* number of wide char in vals*/
	wchar_t vals[CURSES_CCHAR_MAX]; /* wide chars including non-spacing */
};
vals array contains the spacing character and associated non-spacing characters. Note that NetBSD supports wchar_t (wide character) due to which multi-byte characters are supported. To use the complex characters one has to correctly set the locale settings. In this coding period, I wrote tests for routines involving complex characters.
Alternate character set
When you print "BSD", you would send the hex-codes 42, 53, 44 to the terminal. Capability of graphic capable printers was limited by 8-bit ASCII code. To solve this, additional character sets were introduced. We can switch between the modes using escape sequence. One such character set for Special Graphics is used by curses for line drawing. In a shell you can type
echo -e "\e(0j\e(b"to get a lower-right corner glyph. This enables alternate character mode (\e(), prints a character(j) and disables alternate character mode (\e(b). One might wonder where this 'j' to 'Lower Right Corner glyph' comes from. You may see that mapping ("acsc=``aaffggiijjkkllmmnnooppqqrrssttuuvvwwxxyyzz{{||}}~~,) via
infocmp -1 $TERM | grep acscThese characters are used in box_set(), border_set(), etc. functions which I tested in the second coding period.
Progress in the second coding phase
Improvements in the framework:
- Added support for testing of functions to be called before
initscr() - Updated the unsupported function definitions with some minor bug fixes.
Testing and bug reports
- Added tests for following families of functions:
- Complex character routines.
- Line/box drawing routines.
- Pad routines.
- Window and sub-window operations.
- Curson manipulation routines
- Reported bugs (and possible fixes if I know):
- lib/55454
wredrawln()in libcurses does not follow the sensible behaviour [fixed] - lib/55460 copy error in libcurses [fixed]
- lib/55474
wattroff()unsets all attributes if passed STANDOUT as argument [standard is not clear, so decided to have as it is] - lib/55482
slk_restore()does not restore the slk screen - lib/55484
newwin()results into seg fault [fixed] - lib/55496
bkgrnd()doesn't work as expected - lib/55517
wresize()function incorrectly resizes the subwindows
- lib/55454
I would like to thank my mentors Brett and Martin, as well as the NetBSD community for their support whenever I faced some issues.
This report was written by Apurva Nandan as part of Google Summer of Code 2020.
This blog post is in continuation of GSoC Reports: Benchmarking NetBSD, first evaluation report blog and describes my progress in the second phase of GSoC 2020 under The NetBSD Foundation.
In this phase, I worked on the automation of the regression suite made using Phoronix Test Suite (PTS) and its integration with Anita.
The automation framework consists of two components Phoromatic server, provided by Phoronix Test Suite in pkgsrc, and Anita, a Python tool for automating NetBSD installation.
About Phoromatic
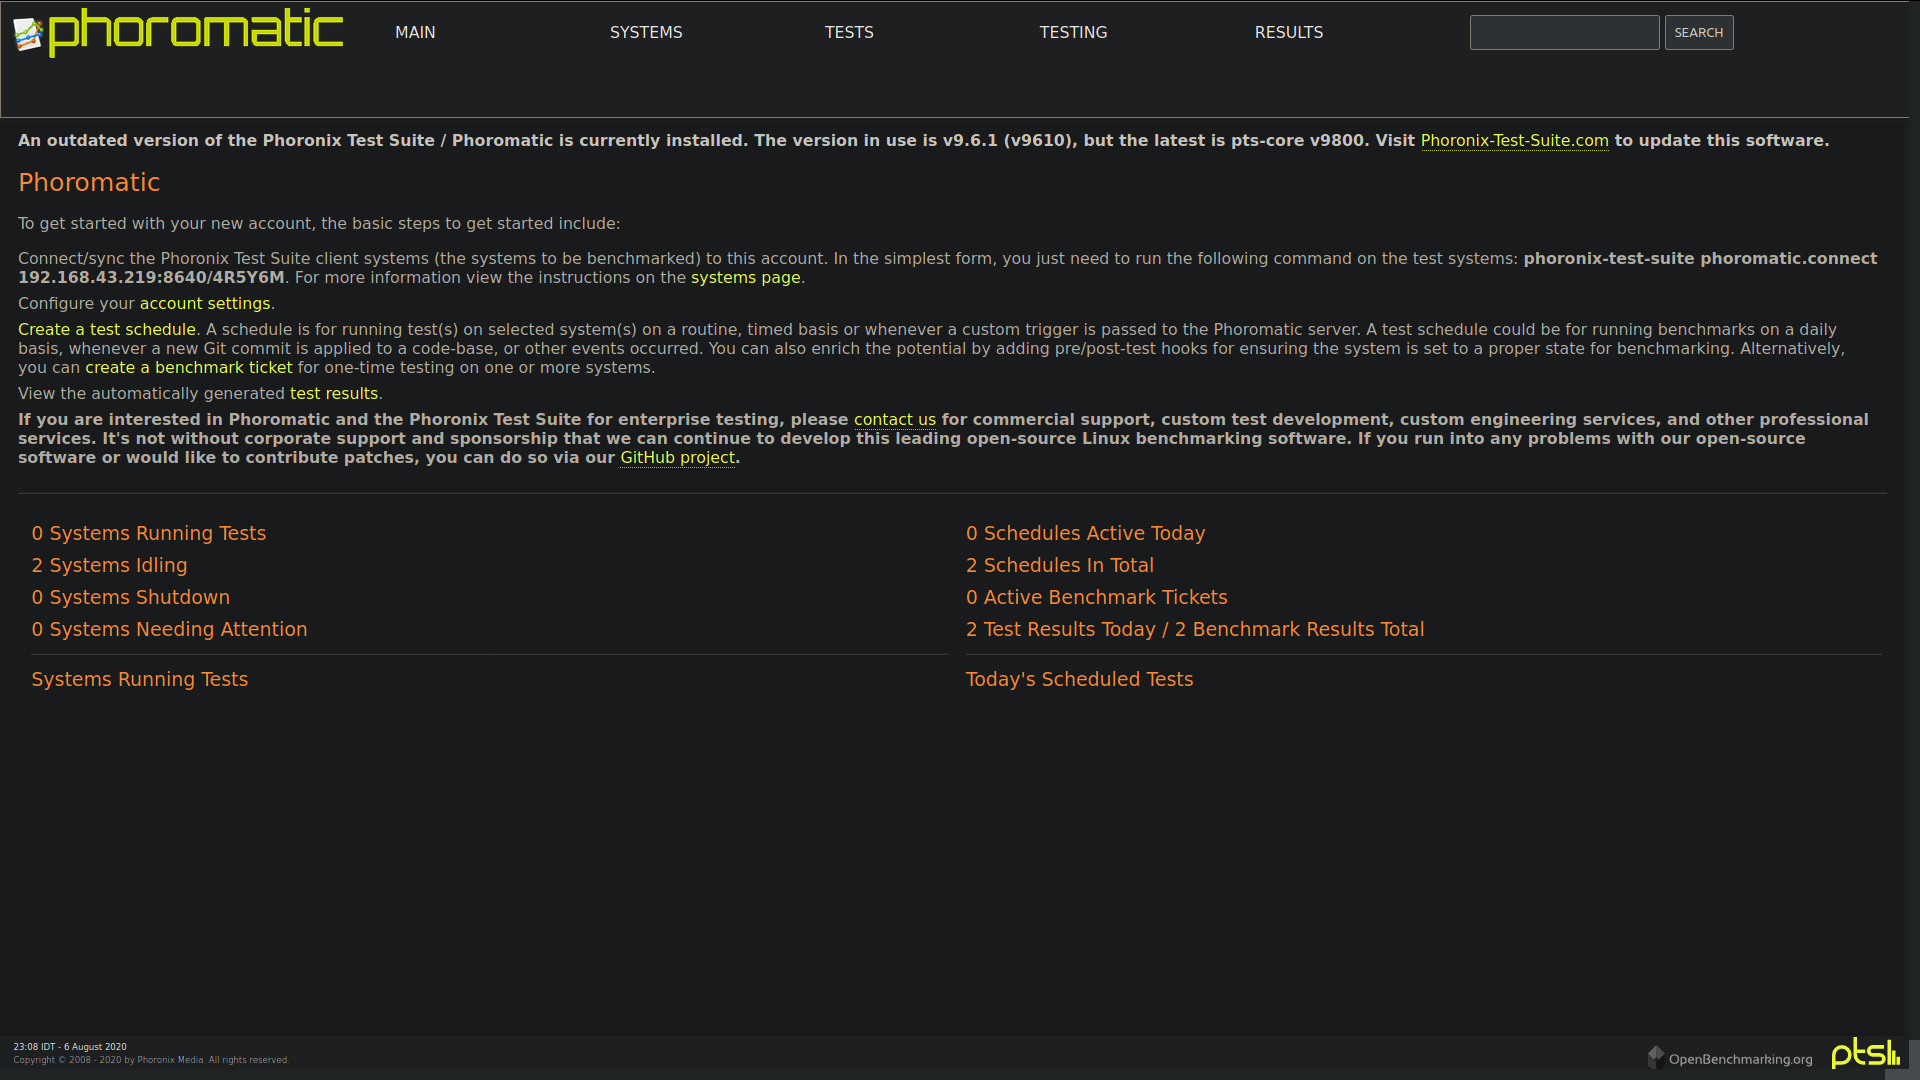
Phoromatic is a remote management system for the Phoronix Test Suite, which allows the automatic scheduling of tests, remote installation of new tests, and the management of multiple test systems through a web interface. Tests can be scheduled to run on a routine basis across multiple test systems automatically. Phoromatic can also interface with revision control systems to offer support for issuing new tests on a context-basis, such as whenever a Git commit has been pushed. The test results are then available from the web interface.
Phoromatic client-server architecture
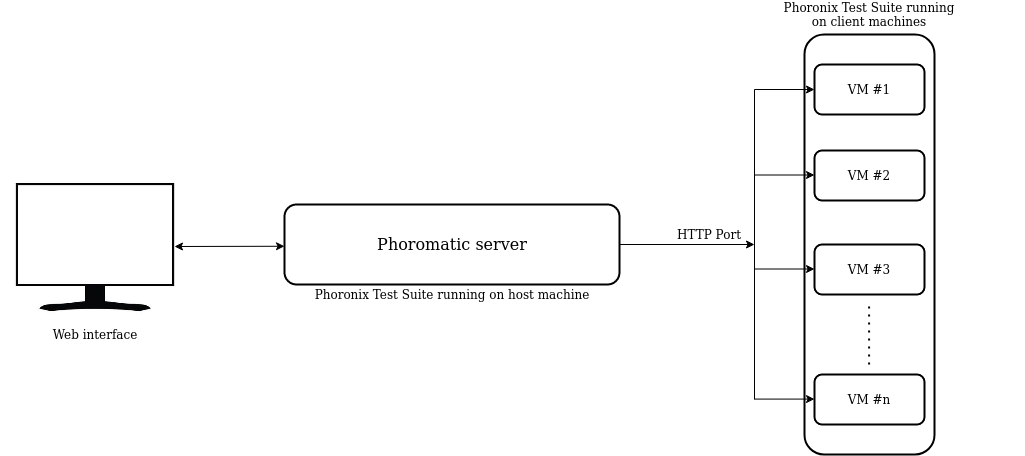
The Phoromatic server relies upon a PHP/HHVM built-in web server process and a PTS-hosted WebSocket server. The web server process handles the web UI and the responsibilities of the Phoromatic server.
Phoromatic clients are testing machines installed with PTS that connect to the Phoromatic web server through the HTTP port of the server.
Phoromatic Setup
To start the Phoromatic server, Phoromatic server HTTP port and web
server socket port needs to be set in
~/.phoronix-test-suite/user-config.xml as shown:
...
<Server>
      <RemoteAccessPort>8640</RemoteAccessPort>
      <Password></Password>
      <WebSocketPort>8642</WebSocketPort>
      <AdvertiseServiceZeroConf>TRUE</AdvertiseServiceZeroConf>
      <AdvertiseServiceOpenBenchmarkRelay>TRUE</AdvertiseServiceOpenBenchmarkRelay>
      <PhoromaticStorage>~/.phoronix-test-suite/phoromatic/</PhoromaticStorage>
</Server>
Phoromatic Usage
To start the Phoromatic web server for controlling local Phoronix Test Suite client systems:
$ phoronix-test-suite start-phoromatic-server
The Phoromatic web server will be hosted at localhost:8640 and will require a local account creation on the server.
Phoromatic Clients
The Phoromatic client is used for connecting to a Phoromatic server to facilitate the automatic running of tests on that client.
Phoromatic clients can be created and connected to the server using the following command:
$ phoronix-test-suite phoromatic.connect SERVER_IP:SERVER_HTTP_PORT/ACCOUNT_ID
Phoromatic server interacts with the Phoromatic clients through the HTTP port specified in the ~/.phoronix-test-suite/user-config.xml.
Phoromatic Test-schedules
A test schedule is used to facilitate automatically running a set of test(s)/suite(s) on either a routine timed basis or whenever triggered by an external script or process, e.g. Git/VCS commit, manually triggered, etc. Phoromatic provides an option for pre-install, pre-run, post-install and post-run shell scripts that are executed on the Phoromatic clients. Test-schedules can be configured to run any tests on any specific systems.
About Anita
Anita is a tool for automated testing of the NetBSD operating system. Using Anita, we can download a NetBSD distribution and install it in a virtual machine in a fully automated fashion. Anita is written in Python and uses the pexpect module to “screen scrape” the sysinst output over an emulated serial console and script the installation procedure.
Installation
Anita can be installed on NetBSD, Linux and macOS systems using the following:
$ pip install pexpect
$ git clone https://github.com/gson1703/anita/
$ python setup.py install
Phoromatic-Anita Integration
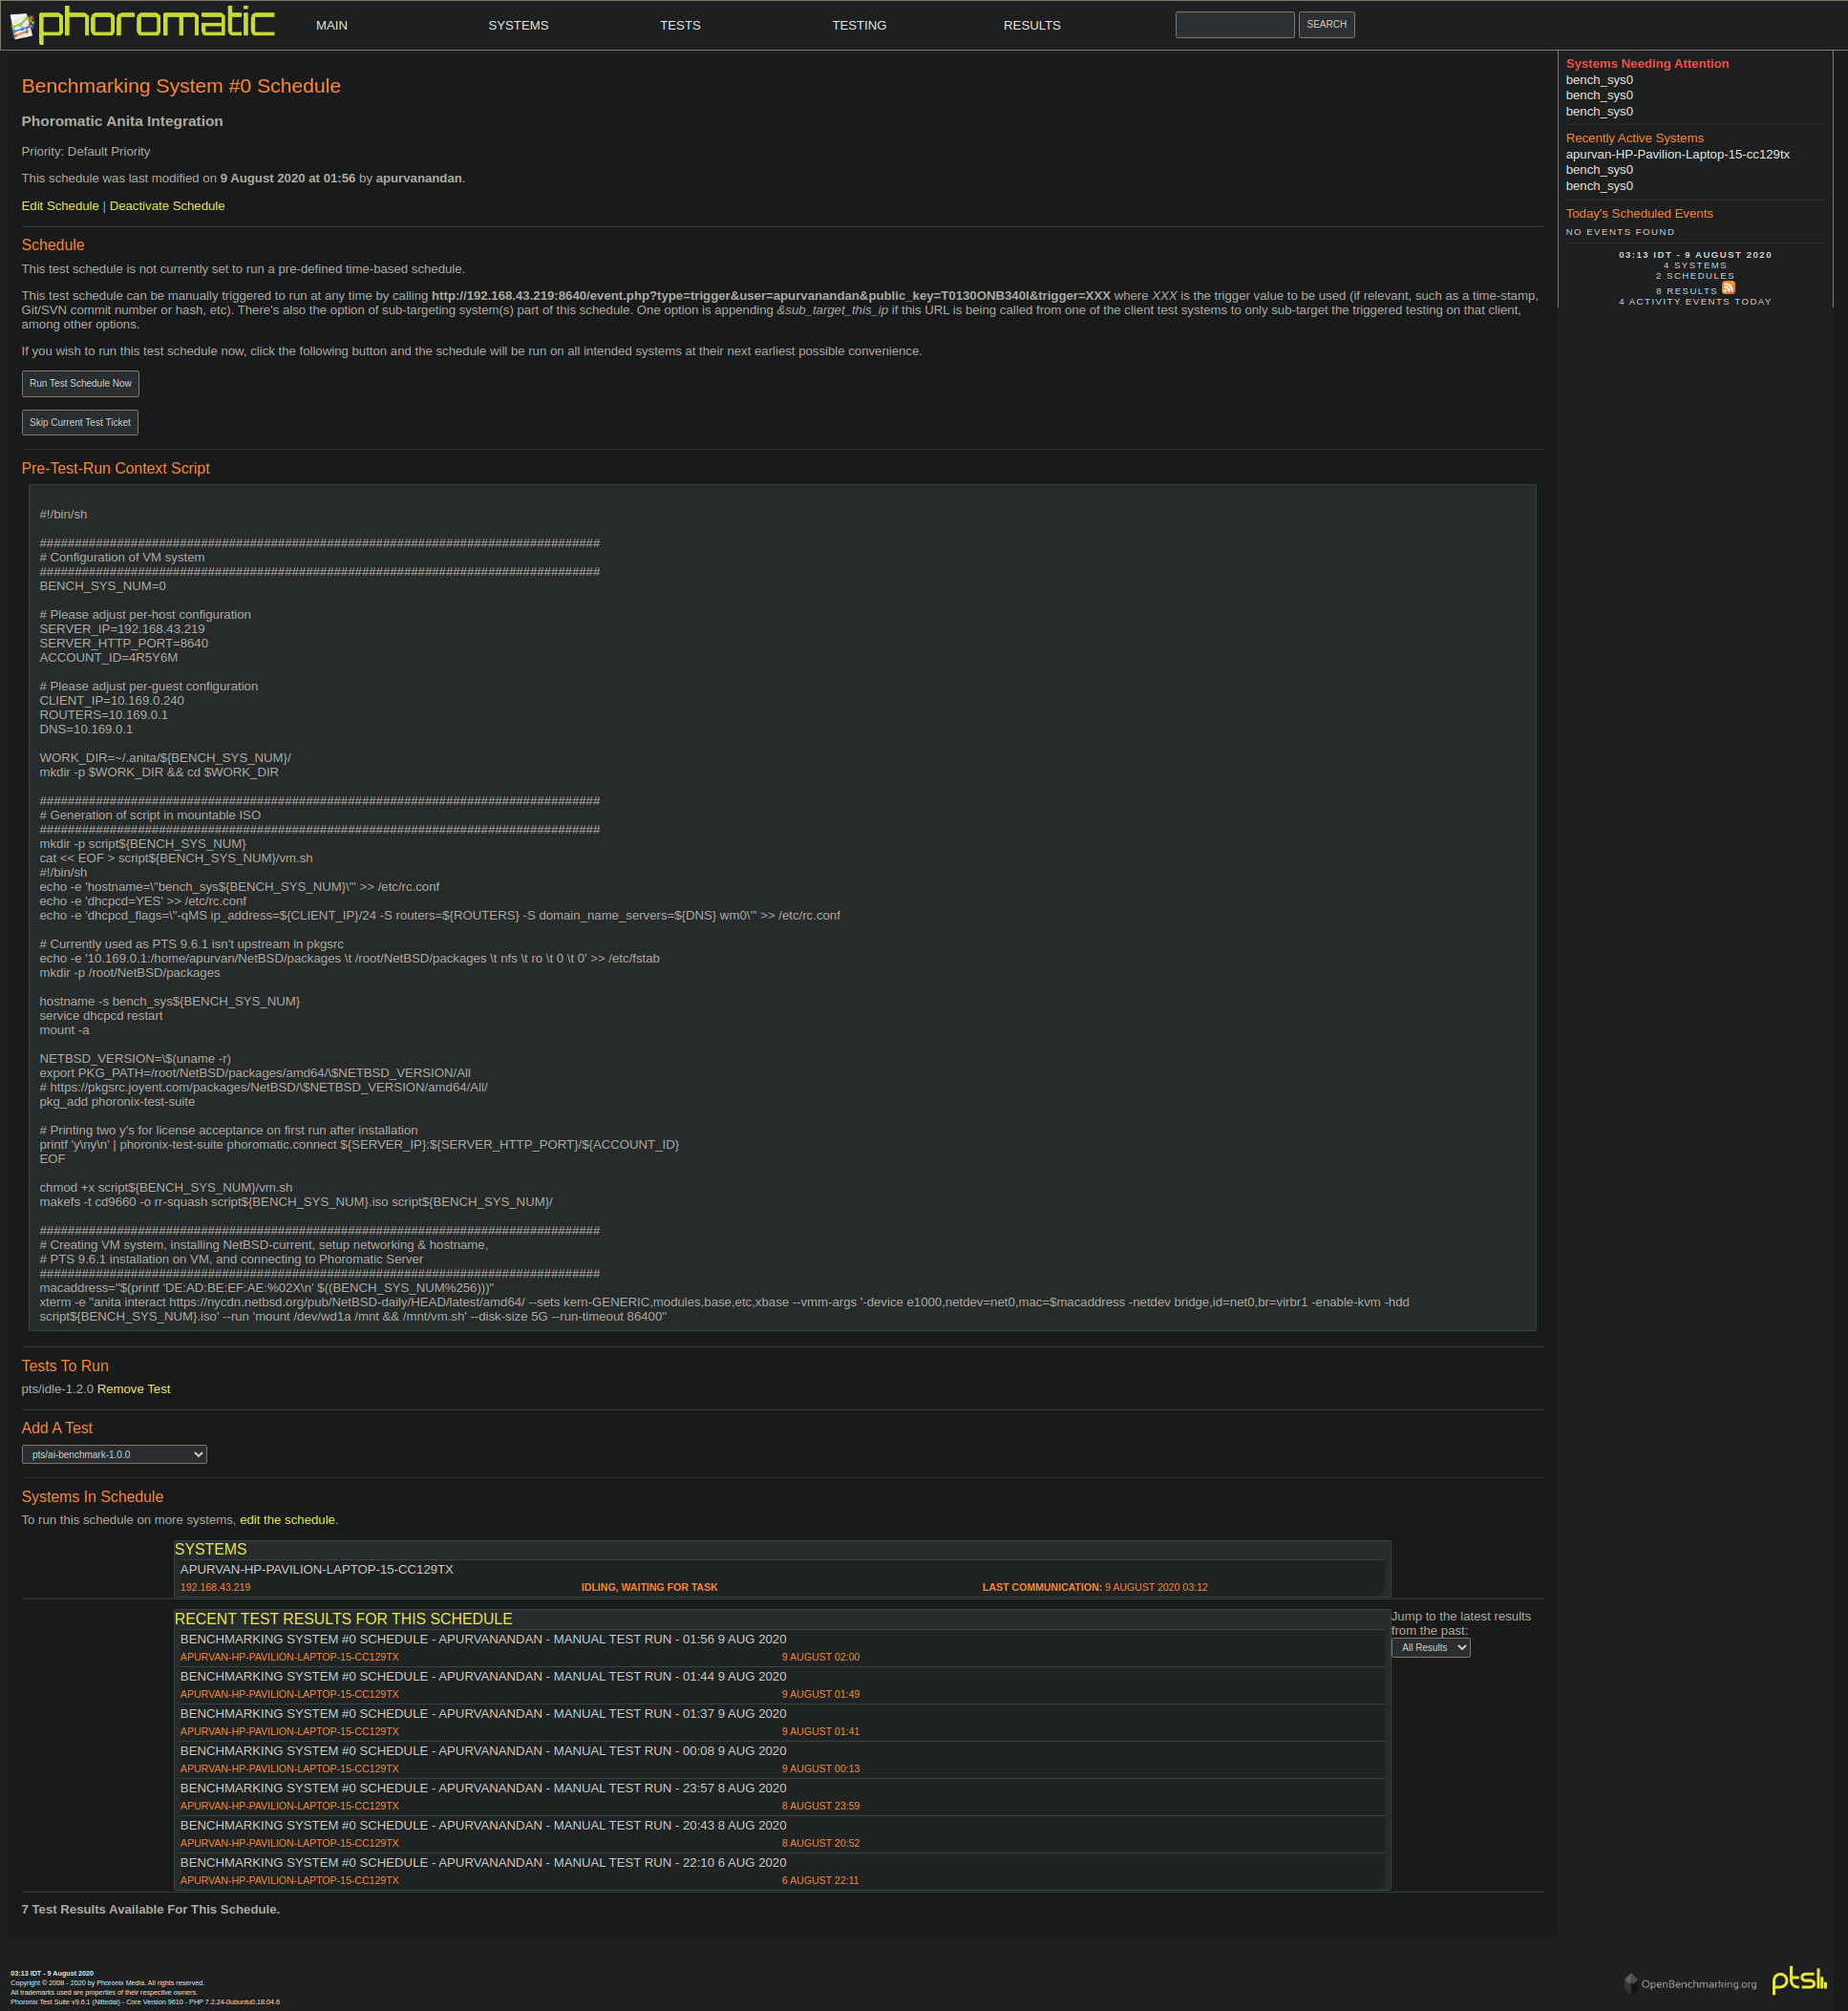
I would like to describe the workflow here briefly:
- A test-schedule was created on the Phoromatic server meant to run
pts/idle-1.2.0test on the host machine that contains the phoromatic-anita-integration.sh as a pre-run script. - The script performs the following:
- Creates a mountable disk image with an executable script for setting up Phoronix Test Suite and Phoromatic client creation on the benchmarking VM systems.
- Invokes Anita with the appropriate command-line options for configurations and network setup and mounts the image to run the configuration script on the VM.
- Configuration script performs hostname change, DHCP setup, NFS
setup,
PKG_PATHsetup, PTS installation, its configuration and connecting it to the Phoromatic server through a network bridge.
- Once the benchmarking VM systems get connected to the Phoromatic server, Phoromatic server identifies the benchmarking VM systems with their IP address, hostname and MAC address.
- After the identification, Phoromatic initiates the pending tests on VM (test-profiles are downloaded on the go in the VM and executed) and maintains a history of the test result data.
Few points to be noted:
- I have used a local PKG_PATH with a NFS server setup as PTS 9.6.1 is available in wip and recompiling it would be a wastage of time. Later I have planned to use the binary shard by Joyent: https://pkgsrc.joyent.com/packages/NetBSD/9.99.69/amd64/All/ once the updated PTS gets upstreamed.
- The host machine needs some one-time manual setup like installation of QEMU, Anita, pexpect, term, cvs, etc., initial user registration on Phoromatic server, Phoromatic port setup, network bridge setup. Apart from this, the rest of the framework does not require user supervision.
VM configuration script
The following script is used as a pre-run script in the test-schedules for invoking Anita and setting up the VMs:
https://gist.github.com/apurvanandan1997/48b54402db1df3723920735f85fc7934
Networking Setup
A bridged networking mode configuration of QEMU has been used in Anita as multiple VMs will be able to accommodate with a single bridge (created on the host machine, one-time setup) using dhcpcd(8), without complicated host forwarding setup (Phoromatic server requires HTTP port forwarding).
In order to enable bridged networking for your QEMU guests, you must first create and configure a bridge interface on your host.
# ifconfig virbr0 create
Next, you must specify the newly-created bridge interface in
/etc/qemu/bridge.conf:
$ sudo mkdir /etc/qemu
$ sudo touch /etc/qemu/bridge.conf && sudo chmod 644 /etc/qemu/bridge.conf
$ sudo sh -c "echo 'allow virbr0' >> /etc/qemu/bridge.conf"
Finally, in order for non-privileged processes to be able to invoke qemu-bridge-helper, you must set the setuid bit on the utility:
$ sudo chmod u+s /usr/local/libexec/qemu-bridge-helper
For more details on the bridged mode networking setup in QEMU, please refer to the following guides:
- https://t.pagef.lt/basic-networking-with-qemu/
- https://www.NetBSD.org/docs/guide/en/chap-net-practice.html#chap-net-practice-bridge
Reproducing the framework
To reproduce the framework, you need to have Phoronix Test Suite, QEMU, Anita, pexpect, cvs, xterm, makefs installed on your host machine.
For example on NetBSD:
# pkg_add qemu
# pkg_add py37-anita
$ cd pkgsrc/wip/phoronix-test-suite
$ make install
The step-by-step process to get the framework after installing PTS, including the one-time manual setup, can be summarized as follows: All control and configuration of the Phoromatic Server is done via the web-based interface when the Phoromatic Server is active.
- Configure the port of Phoromatic server as 8640 and web socket as 8642 as described above.
- Start the Phoromatic server using the command stated above.
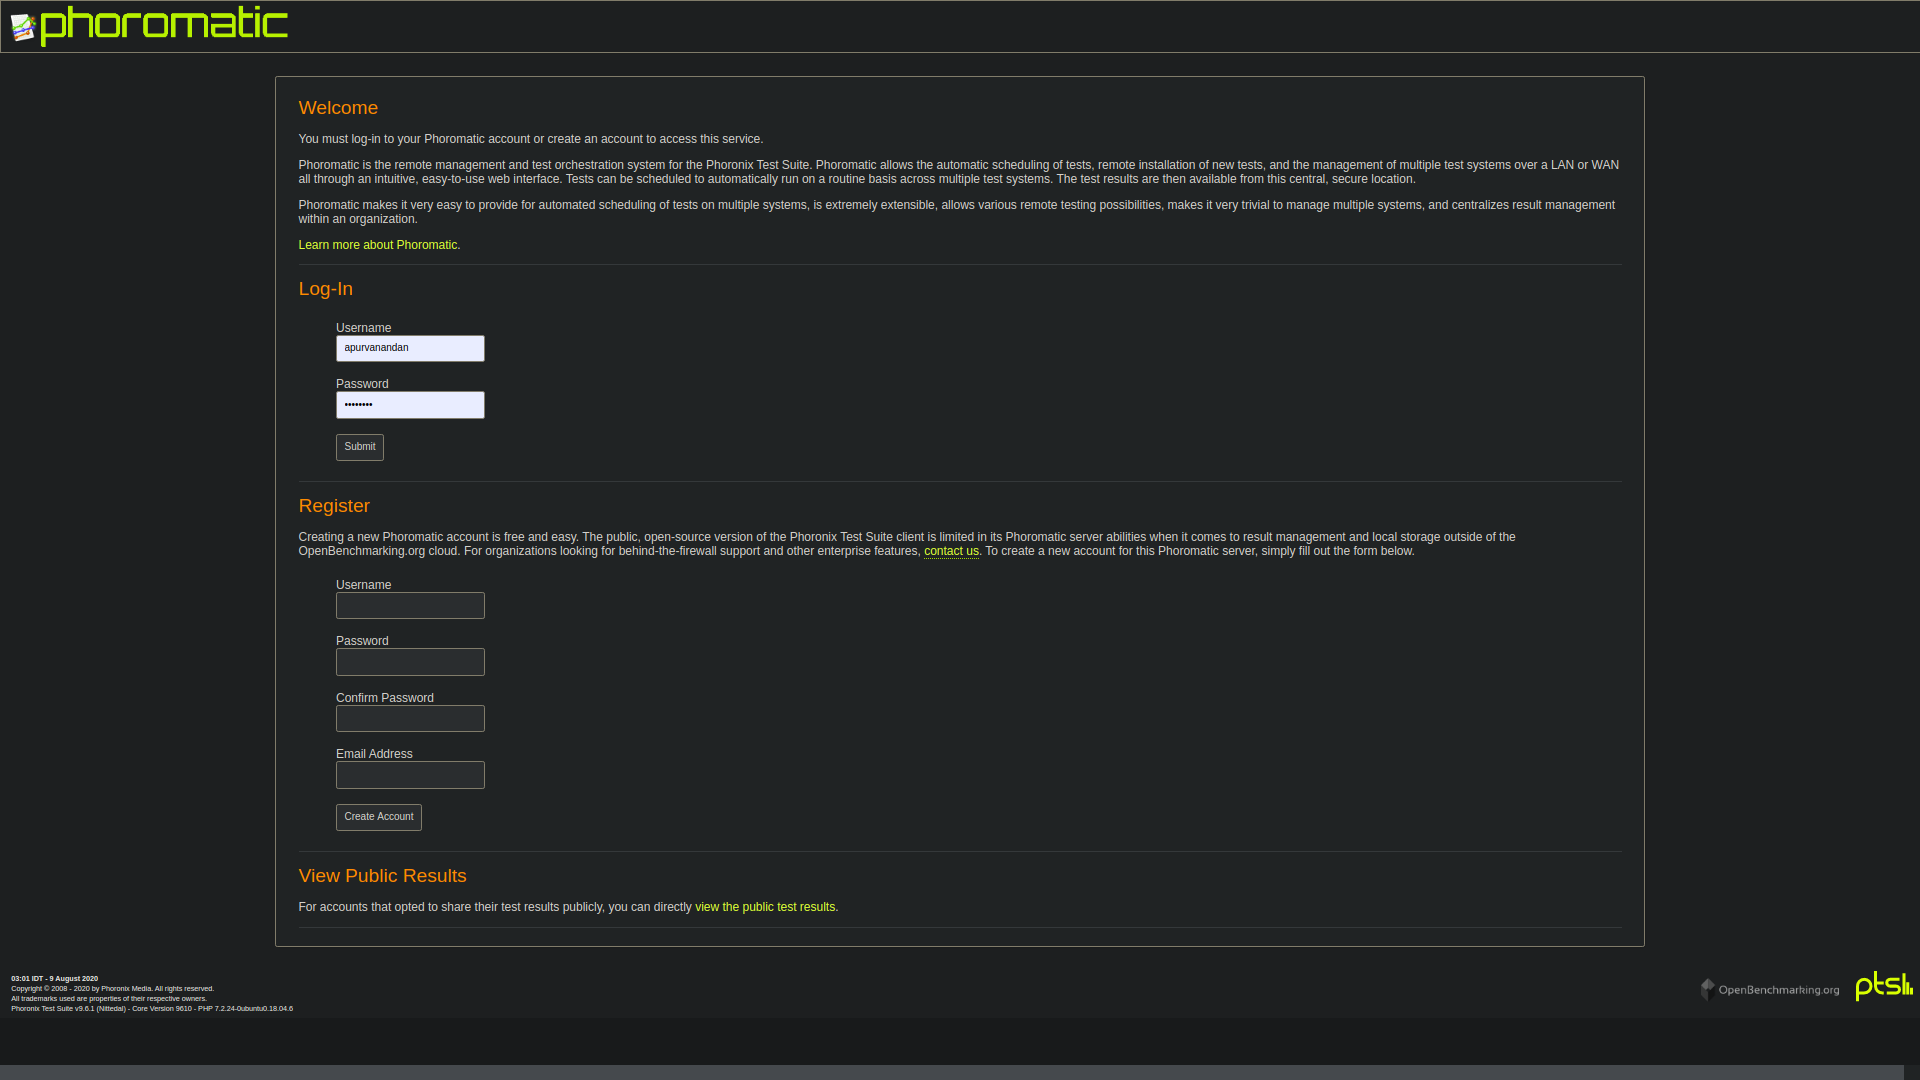
- Create your user account on the Phoromatic server using the web interface GUI.
- Disable client system approval for new system addition from the settings menu in the web interface.
- Connect the host machine as a Phoromatic client to the Phoromatic server using the command stated above.
- Create a test-schedule for the host machine with the
pre-run script
as specified above and
pts/idle-1.2.0as the test-profile.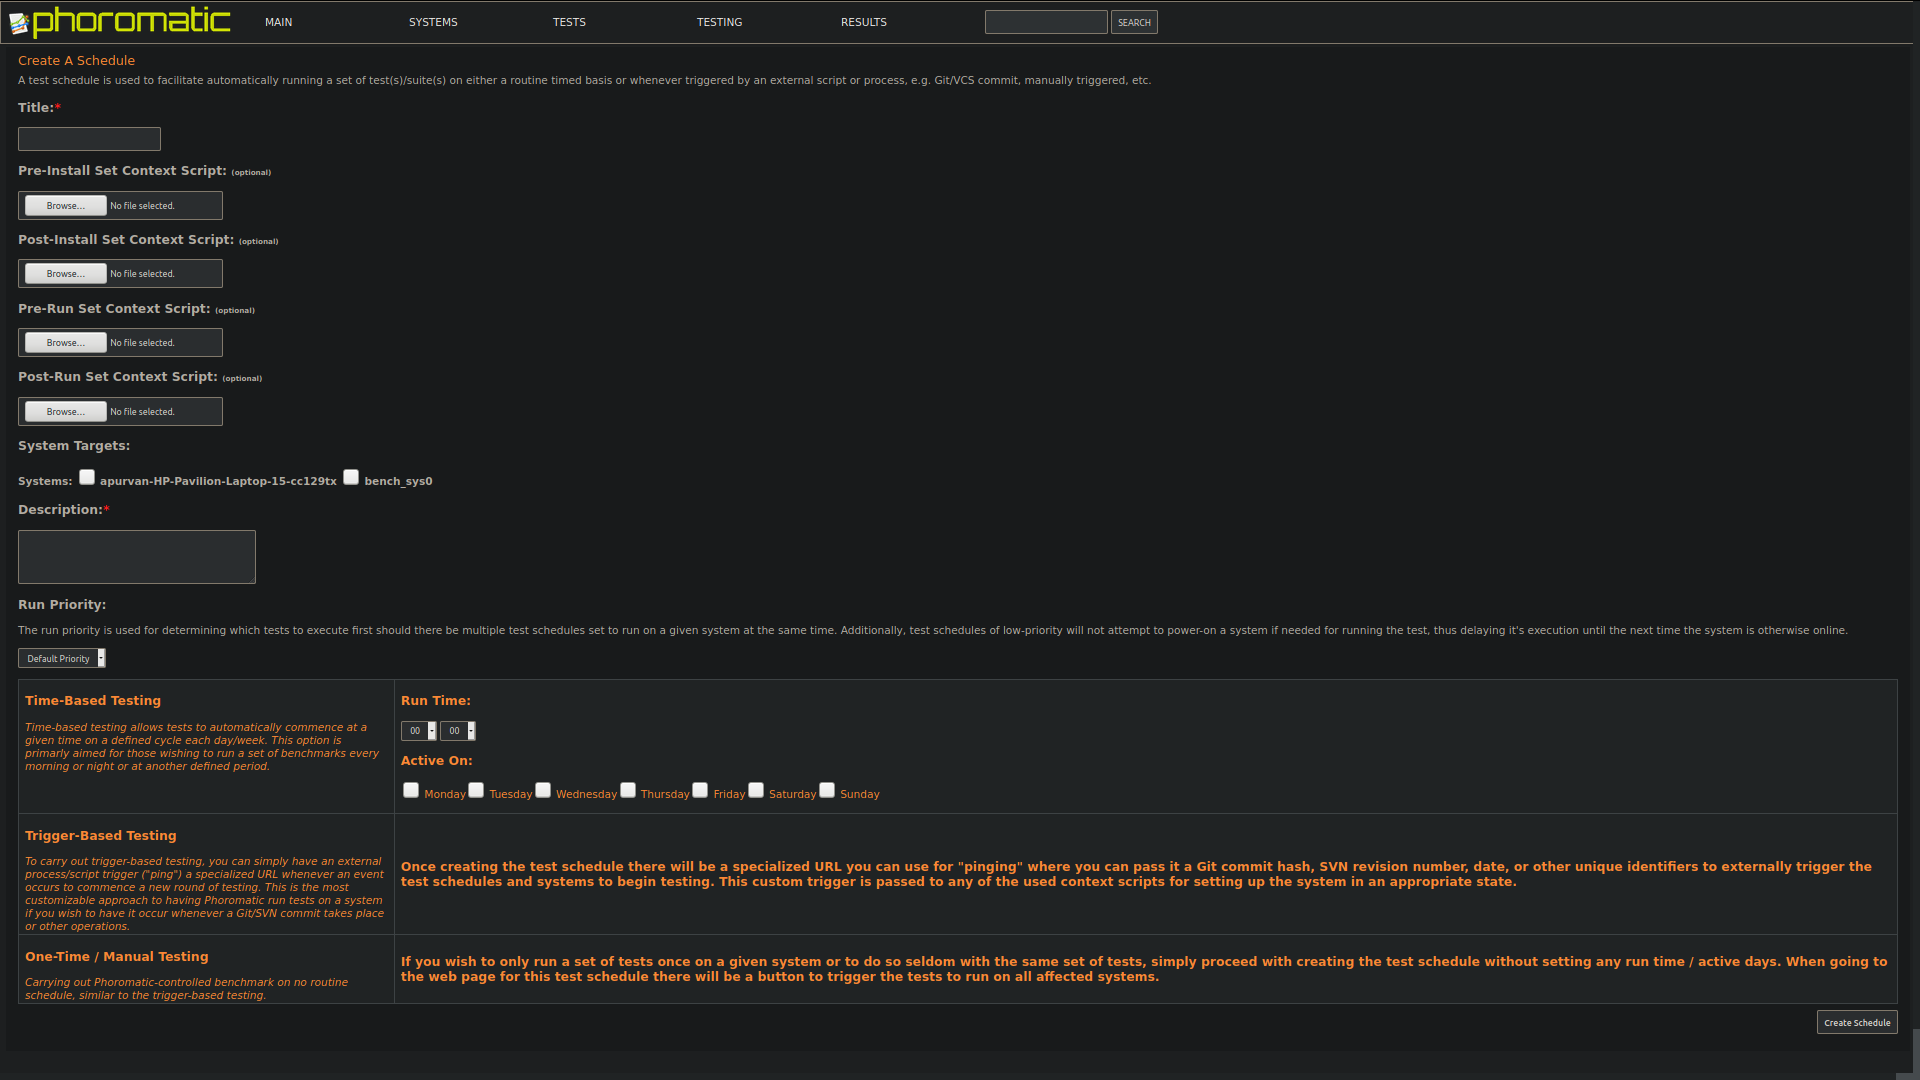
- Execute the test-schedule or assign it on a timed-schedule and watch it running!
- New VM systems with the latest NetBSD-current binaries and packages will be created and identified by Phoromatic server automatically.
- Once for all, we need to specify what benchmarking test-profiles need
to be run on the VM systems in the test-schedules section and it will
be taken care of by Phoromatic.

- The result history can also be viewed from Phoromatic web interface.
You can have a look at the video to get a clearer picture of how to setup the framework:
Future Plans
The regression suite is complete and final tasks of deploying it on benchmark.NetBSD.org and upstreaming the wip of Phoronix Test Suite will be done in the final phase of my GSoC project. I want to thank my mentors for their constant support.
This report was written by Apurva Nandan as part of Google Summer of Code 2020.
This blog post is in continuation of GSoC Reports: Benchmarking NetBSD, first evaluation report blog and describes my progress in the second phase of GSoC 2020 under The NetBSD Foundation.
In this phase, I worked on the automation of the regression suite made using Phoronix Test Suite (PTS) and its integration with Anita.
The automation framework consists of two components Phoromatic server, provided by Phoronix Test Suite in pkgsrc, and Anita, a Python tool for automating NetBSD installation.
About Phoromatic
Phoromatic is a remote management system for the Phoronix Test Suite, which allows the automatic scheduling of tests, remote installation of new tests, and the management of multiple test systems through a web interface. Tests can be scheduled to run on a routine basis across multiple test systems automatically. Phoromatic can also interface with revision control systems to offer support for issuing new tests on a context-basis, such as whenever a Git commit has been pushed. The test results are then available from the web interface.
Phoromatic client-server architecture
The Phoromatic server relies upon a PHP/HHVM built-in web server process and a PTS-hosted WebSocket server. The web server process handles the web UI and the responsibilities of the Phoromatic server.
Phoromatic clients are testing machines installed with PTS that connect to the Phoromatic web server through the HTTP port of the server.
Phoromatic Setup
To start the Phoromatic server, Phoromatic server HTTP port and web
server socket port needs to be set in
~/.phoronix-test-suite/user-config.xml as shown:
...
<Server>
      <RemoteAccessPort>8640</RemoteAccessPort>
      <Password></Password>
      <WebSocketPort>8642</WebSocketPort>
      <AdvertiseServiceZeroConf>TRUE</AdvertiseServiceZeroConf>
      <AdvertiseServiceOpenBenchmarkRelay>TRUE</AdvertiseServiceOpenBenchmarkRelay>
      <PhoromaticStorage>~/.phoronix-test-suite/phoromatic/</PhoromaticStorage>
</Server>
Phoromatic Usage
To start the Phoromatic web server for controlling local Phoronix Test Suite client systems:
$ phoronix-test-suite start-phoromatic-server
The Phoromatic web server will be hosted at localhost:8640 and will require a local account creation on the server.
Phoromatic Clients
The Phoromatic client is used for connecting to a Phoromatic server to facilitate the automatic running of tests on that client.
Phoromatic clients can be created and connected to the server using the following command:
$ phoronix-test-suite phoromatic.connect SERVER_IP:SERVER_HTTP_PORT/ACCOUNT_ID
Phoromatic server interacts with the Phoromatic clients through the HTTP port specified in the ~/.phoronix-test-suite/user-config.xml.
Phoromatic Test-schedules
A test schedule is used to facilitate automatically running a set of test(s)/suite(s) on either a routine timed basis or whenever triggered by an external script or process, e.g. Git/VCS commit, manually triggered, etc. Phoromatic provides an option for pre-install, pre-run, post-install and post-run shell scripts that are executed on the Phoromatic clients. Test-schedules can be configured to run any tests on any specific systems.
About Anita
Anita is a tool for automated testing of the NetBSD operating system. Using Anita, we can download a NetBSD distribution and install it in a virtual machine in a fully automated fashion. Anita is written in Python and uses the pexpect module to “screen scrape” the sysinst output over an emulated serial console and script the installation procedure.
Installation
Anita can be installed on NetBSD, Linux and macOS systems using the following:
$ pip install pexpect
$ git clone https://github.com/gson1703/anita/
$ python setup.py install
Phoromatic-Anita Integration
I would like to describe the workflow here briefly:
- A test-schedule was created on the Phoromatic server meant to run
pts/idle-1.2.0test on the host machine that contains the phoromatic-anita-integration.sh as a pre-run script. - The script performs the following:
- Creates a mountable disk image with an executable script for setting up Phoronix Test Suite and Phoromatic client creation on the benchmarking VM systems.
- Invokes Anita with the appropriate command-line options for configurations and network setup and mounts the image to run the configuration script on the VM.
- Configuration script performs hostname change, DHCP setup, NFS
setup,
PKG_PATHsetup, PTS installation, its configuration and connecting it to the Phoromatic server through a network bridge.
- Once the benchmarking VM systems get connected to the Phoromatic server, Phoromatic server identifies the benchmarking VM systems with their IP address, hostname and MAC address.
- After the identification, Phoromatic initiates the pending tests on VM (test-profiles are downloaded on the go in the VM and executed) and maintains a history of the test result data.
Few points to be noted:
- I have used a local PKG_PATH with a NFS server setup as PTS 9.6.1 is available in wip and recompiling it would be a wastage of time. Later I have planned to use the binary shard by Joyent: https://pkgsrc.joyent.com/packages/NetBSD/9.99.69/amd64/All/ once the updated PTS gets upstreamed.
- The host machine needs some one-time manual setup like installation of QEMU, Anita, pexpect, term, cvs, etc., initial user registration on Phoromatic server, Phoromatic port setup, network bridge setup. Apart from this, the rest of the framework does not require user supervision.
VM configuration script
The following script is used as a pre-run script in the test-schedules for invoking Anita and setting up the VMs:
https://gist.github.com/apurvanandan1997/48b54402db1df3723920735f85fc7934
Networking Setup
A bridged networking mode configuration of QEMU has been used in Anita as multiple VMs will be able to accommodate with a single bridge (created on the host machine, one-time setup) using dhcpcd(8), without complicated host forwarding setup (Phoromatic server requires HTTP port forwarding).
In order to enable bridged networking for your QEMU guests, you must first create and configure a bridge interface on your host.
# ifconfig virbr0 create
Next, you must specify the newly-created bridge interface in
/etc/qemu/bridge.conf:
$ sudo mkdir /etc/qemu
$ sudo touch /etc/qemu/bridge.conf && sudo chmod 644 /etc/qemu/bridge.conf
$ sudo sh -c "echo 'allow virbr0' >> /etc/qemu/bridge.conf"
Finally, in order for non-privileged processes to be able to invoke qemu-bridge-helper, you must set the setuid bit on the utility:
$ sudo chmod u+s /usr/local/libexec/qemu-bridge-helper
For more details on the bridged mode networking setup in QEMU, please refer to the following guides:
- https://t.pagef.lt/basic-networking-with-qemu/
- https://www.NetBSD.org/docs/guide/en/chap-net-practice.html#chap-net-practice-bridge
Reproducing the framework
To reproduce the framework, you need to have Phoronix Test Suite, QEMU, Anita, pexpect, cvs, xterm, makefs installed on your host machine.
For example on NetBSD:
# pkg_add qemu
# pkg_add py37-anita
$ cd pkgsrc/wip/phoronix-test-suite
$ make install
The step-by-step process to get the framework after installing PTS, including the one-time manual setup, can be summarized as follows: All control and configuration of the Phoromatic Server is done via the web-based interface when the Phoromatic Server is active.
- Configure the port of Phoromatic server as 8640 and web socket as 8642 as described above.
- Start the Phoromatic server using the command stated above.
- Create your user account on the Phoromatic server using the web interface GUI.
- Disable client system approval for new system addition from the settings menu in the web interface.
- Connect the host machine as a Phoromatic client to the Phoromatic server using the command stated above.
- Create a test-schedule for the host machine with the
pre-run script
as specified above and
pts/idle-1.2.0as the test-profile. - Execute the test-schedule or assign it on a timed-schedule and watch it running!
- New VM systems with the latest NetBSD-current binaries and packages will be created and identified by Phoromatic server automatically.
- Once for all, we need to specify what benchmarking test-profiles need
to be run on the VM systems in the test-schedules section and it will
be taken care of by Phoromatic.
- The result history can also be viewed from Phoromatic web interface.
You can have a look at the video to get a clearer picture of how to setup the framework:
Future Plans
The regression suite is complete and final tasks of deploying it on benchmark.NetBSD.org and upstreaming the wip of Phoronix Test Suite will be done in the final phase of my GSoC project. I want to thank my mentors for their constant support.
The objective of this project is to fuzz the various protocols and layers of the network stack of NetBSD using rumpkernel. This project is being carried out as a part of GSoC 2020. This blog post is regarding the project, the concepts and tools involved, the objectives and the current progress and next steps.
You can read the previous post/report here.
Overview of the work done:
The major time of the phase 1 and 2 were spent in analyzing the input and output paths of the particular protocols being fuzzed. During that time, 5 major protocols of the internet stack were taken up:
- IPv4 (Phase 1)
- UDP (Phase 1)
- IPv6 (Phase 2)
- ICMP (Phase 2)
- Ethernet (Phase 2)
Quite a good amount of time was spent in understanding the input and output processing functions of the particular protocols, the information gathered was to be applied in packet creation code for that protocol. This is important so that we know which parts of the packet can be kept random by the fuzzer based input and which part of the packet need to be set to proper fixed values. Fixing some values in the data packet to be correct is important so that the packet does not get rejected for trivial cases like IP Protocol Version or Internet Checksum. (The procedure to come up with the decisions and the code design and flow is explained in IPv4 Protocol section as an example)
For each protocol, mainly 2 things needed to be implemented:
- The Network Config: the topology for sending and receiving packets example using a TUN device or a TAP device, the socket used and so on. Configuring these devices was the first step in being able to send or receive packets
- Packet Creation: Using the information gathered in the code walkthrough of the protocol functions, packet creation is decided where certain parts of the packet are kept fixed and others random from the fuzzer input itself. Doing so we try to gain maximum code coverage. Also one thing to be noted here, we should not randomly change the fuzzer input, rather do it deterministically following the same rules for each packet, otherwise the evolutionary fuzzer cannot easily grow the corpus.
In the next section, a few of the protocols will be explained in detail.
Protocols
In this section we will talk about the various protocols implemented for fuzzing and talk about the approach taken to create a packet.
IPv4:
IPv4 stands for the Internet protocol version 4. It is one of the most widely used protocols in the internet family of protocols. It is used as a network layer protocol for routing and host to host packet delivery using an addressing scheme called IP Address(A 32 bit address scheme). IP Protocol also handles a lot of other functions like fragmentation and reassembly of packets to accommodate for transmission of packets over varying sizes of physical channel capacities. It also supports the concept of multicasting and broadcasting (Via IP Options).
In order to come up with a strategy for fuzzing, the first step was to carry out a code walkthrough of relevant functions/APIs and data structures involved in the IPv4 protocol. For that the major files and components studied were:
- ip_input() => Which carries out the processing of a incoming packet at the network layer for IPv4 (src here)
- ip_output() => Which carries out the processing of an outgoing packet at the network layer for IPv4 (src here)
- struct ip => Represents the IP header (src here)
These sections of code represent the working of the input and output processing paths of IPv4 protocol and the struct ip is the main IPv4 header. On top of that other APIs related to mbuf (The NetBSD packet), ip_forward(), IP assembly and fragmentation etc. were also studied in order to determine information about packet structure that could be followed.
In order to be able to reach these various aspects of the protocol and be able to fuzz it, we went forward with packet creation that took care of basic fields of the IP Header so that it would not get rejected in trivial cases as mentioned before. Hence we went ahead and fixed these fields:
- IP Version: Set it to 0x4 which is a 4 bit value.
- IP Header Len: Which is set to a value greater than or equal to sizeof(struct ip). Setting this to greater than that allows for IP Options processing.
- IP Len: Set it to the size of the random buffer passed by fuzzer.
- IP Checksum: We calculate the correct checksum for the packet using the internet checksum algorithm.
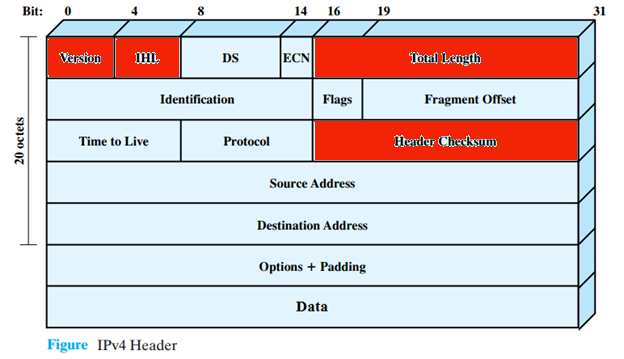
Other fields were allowed to be populated randomly by fuzzer input. Here is an illustration of the IPv4 header with the fields marked in red as fixed.
The packet creation code lies in the following section inside [pkt_create.c]. Another important component is the network configuration [located here net_config] where the code related to configuring a TUN/TAP device is present. All the code uses the rumpkernel exposed APIs and syscalls (prepended with rump_sys_) so as to utilize the rumpkernel while executing the application binary. After packet creation and network config is handled the main fuzzing function is written where a series of steps are followed:
- We call rump_init() to initialize the rumpkernel linked via libraries
- We setup the Client and server IP addresses
- We setup the TUN device by calling the network config functions described above
- We create the packet using the packet creation function utilizing the random buffer passed by the fuzzer and transforming that into a semi-random buffer.
- Pass this forged packet into the network stack of the rumpkernel linked with the application binary by calling rump_sys_write on the TUN device setup.
IPv6:
IPv6 stands for the Internet protocol version 4. It is the successor of the IPv4 protocol. It came into existence in order to overcome the addressing requirements that could not fit in a 32 bit IPv4 address. It is used as a network layer protocol for routing and host to host packet delivery using an addressing scheme called IPv6 Address(A 128 bit address scheme). It also supports almost similar other functions as IPv4 except some things like fragmentation, broadcast(instead uses multicast).
In order to be able to reach these various aspects of the protocol and be able to fuzz it, we went forward with packet creation that took care of basic fields of the IP Header so that it would not get rejected in trivial cases as mentioned before. Hence we went ahead and fixed these fields:
- IP Version: Set it to 0x6 which is a 4 bit value.
- IP Hop Limit: This is an alias for TTL. Set it to a maximum possible value of 255(8 bits).
Other fields were allowed to be populated randomly by fuzzer input. Allowing the payload len value to be randomly populated allowed processing of various “next headers” or ”Extension headers”. Extension headers carry optional Internet Layer information, and are placed between the fixed header and the upper-layer protocol header. The headers form a chain, using the Next Header fields. The Next Header field in the fixed header indicates the type of the first extension header; the Next Header field of the last extension header indicates the type of the upper-layer protocol header in the payload of the packet. A further work can be done to set the value of the next header chain and form packets for multiple scenarios with a combination of various next headers.
UDP:
UDP stands for User Datagram Protocol. It is one of the simplest protocols and is designed to be simple so that it simply carries payload with minimal overhead. It does not have many options except for checksum information and ports in order to demultiplex the packet to the processes.
Since UDP runs at the transport layer and hence is wrapped up in an IP header. Since we do not want to fuzz the IP code section, we form a well formed IP header so that the packet does not get rejected in the IP processing section. We only randomize the UDP header using the fuzzer input. We used previously built out IP packet creation utilities to form the IP header and then use the fuzzer input for UDP header.
In UDP, we fix the following fields:
- UDP Checksum: Set it to zero in order to avoid checksums.
ICMP:
ICMP stands for Internet control message protocol. This protocol is sometimes called a sister protocol of IP protocol and is used as a troubleshooting protocol at the network layer. It is used for major 2 purposes:
- Error messages
- Request-Reply Queries.
ICMP has a lot of options and is quite generic in the sense that it handles a lot of error messages and queries. Although ICMP is generally considered at the network layer, it is actually wrapped inside an IP header, hence it has its own protocol number(= 1). Again similar to UDP, we wrap the ICMP headers inside IP headers, hence we do not randomize the IP header and only the ICMP headers using fuzzer input.
In order to test various ICMP messages and queries, we could not fix values for the type and code fields in the ICMP header since they decide the ICMP message type. Also if we allowed random input, most of the packets would get rejected since the number of options of type and code fields are limited and most other values would discard the packet while processing. Hence we came up with a solution where we deterministically modified the input bits from the fuzzer corresponding to the code and type fields. For the type field we simply took a modulo of the number of types(ICMP_NTYPES macro used here). For the value of code , we had to fix values in a certain range based on the type value set already. This technique allowed us to cover all different ICMP message types via the fuzzer input. We also ensured that the input buffer was not modified completely randomly, since that is a bad practice for a feedback-driven fuzzer like ours. Apart from this we fixed the ICMP Checksum field as well by calculating the checksum using the internet checksum algorithm.
Ethernet:
Ethernet protocol defined by the IEEE 802.3 standard is a widely used data link layer protocol. The ethernet packet called a frame carries an IP(or the network layer protocol) datagram. The header is simple with Link Layer Addresses called MAC address (used for switching at data link layer which is a part of addressing), for source and destination each of 6 octets(=48 bytes) present, followed by a 4 octet Ethertype and QTag field. This is followed by payload and finally the FCS(frame check sequence) which is a four-octet cyclic redundancy check (CRC) that allows detection of corrupted data within the entire frame as received on the receiver side.
In case of Ethernet protocol fuzzing, we had to use a TAP device instead of a TUN device, since the TUN device supports passing an IP packet to the network stack, whereas a TAP device accepts an ethernet frame.
For packet creation, we set the source and destination MAC address and let the payload and ethertype be randomly populated by the fuzzer.
Current Progress and Next steps
The project currently has reached a stage where many major internet family protocols have been covered for fuzzing. As described above a structured approach to fuzzing them have been taken by forming packets based on the internal workings of the protocols. Also as mentioned in the previous post, Rumpkernel environment is being used for fuzzing all these protocols. In order to get better results as compared to raw fuzzing, we have taken these steps. In the next report we shall talk about and compare the coverage of raw fuzzing with our approach.
For the next phase of GSoC, the major focus would be to validate this process of fuzzing by various methods to check the penetration of packets into the network stack as well as the code coverage. Also the code would be made more streamlined and standardized so that it can be extended for adding more protocols even beyond the scope of the GSoC project.
The objective of this project is to fuzz the various protocols and layers of the network stack of NetBSD using rumpkernel. This project is being carried out as a part of GSoC 2020. This blog post is regarding the project, the concepts and tools involved, the objectives and the current progress and next steps.
You can read the previous post/report here.
Overview of the work done:
The major time of the phase 1 and 2 were spent in analyzing the input and output paths of the particular protocols being fuzzed. During that time, 5 major protocols of the internet stack were taken up:
- IPv4 (Phase 1)
- UDP (Phase 1)
- IPv6 (Phase 2)
- ICMP (Phase 2)
- Ethernet (Phase 2)
Quite a good amount of time was spent in understanding the input and output processing functions of the particular protocols, the information gathered was to be applied in packet creation code for that protocol. This is important so that we know which parts of the packet can be kept random by the fuzzer based input and which part of the packet need to be set to proper fixed values. Fixing some values in the data packet to be correct is important so that the packet does not get rejected for trivial cases like IP Protocol Version or Internet Checksum. (The procedure to come up with the decisions and the code design and flow is explained in IPv4 Protocol section as an example)
For each protocol, mainly 2 things needed to be implemented:
- The Network Config: the topology for sending and receiving packets example using a TUN device or a TAP device, the socket used and so on. Configuring these devices was the first step in being able to send or receive packets
- Packet Creation: Using the information gathered in the code walkthrough of the protocol functions, packet creation is decided where certain parts of the packet are kept fixed and others random from the fuzzer input itself. Doing so we try to gain maximum code coverage. Also one thing to be noted here, we should not randomly change the fuzzer input, rather do it deterministically following the same rules for each packet, otherwise the evolutionary fuzzer cannot easily grow the corpus.
In the next section, a few of the protocols will be explained in detail.
Protocols
In this section we will talk about the various protocols implemented for fuzzing and talk about the approach taken to create a packet.
IPv4:
IPv4 stands for the Internet protocol version 4. It is one of the most widely used protocols in the internet family of protocols. It is used as a network layer protocol for routing and host to host packet delivery using an addressing scheme called IP Address(A 32 bit address scheme). IP Protocol also handles a lot of other functions like fragmentation and reassembly of packets to accommodate for transmission of packets over varying sizes of physical channel capacities. It also supports the concept of multicasting and broadcasting (Via IP Options).
In order to come up with a strategy for fuzzing, the first step was to carry out a code walkthrough of relevant functions/APIs and data structures involved in the IPv4 protocol. For that the major files and components studied were:
- ip_input() => Which carries out the processing of a incoming packet at the network layer for IPv4 (src here)
- ip_output() => Which carries out the processing of an outgoing packet at the network layer for IPv4 (src here)
- struct ip => Represents the IP header (src here)
These sections of code represent the working of the input and output processing paths of IPv4 protocol and the struct ip is the main IPv4 header. On top of that other APIs related to mbuf (The NetBSD packet), ip_forward(), IP assembly and fragmentation etc. were also studied in order to determine information about packet structure that could be followed.
In order to be able to reach these various aspects of the protocol and be able to fuzz it, we went forward with packet creation that took care of basic fields of the IP Header so that it would not get rejected in trivial cases as mentioned before. Hence we went ahead and fixed these fields:
- IP Version: Set it to 0x4 which is a 4 bit value.
- IP Header Len: Which is set to a value greater than or equal to sizeof(struct ip). Setting this to greater than that allows for IP Options processing.
- IP Len: Set it to the size of the random buffer passed by fuzzer.
- IP Checksum: We calculate the correct checksum for the packet using the internet checksum algorithm.
Other fields were allowed to be populated randomly by fuzzer input. Here is an illustration of the IPv4 header with the fields marked in red as fixed.
The packet creation code lies in the following section inside [pkt_create.c]. Another important component is the network configuration [located here net_config] where the code related to configuring a TUN/TAP device is present. All the code uses the rumpkernel exposed APIs and syscalls (prepended with rump_sys_) so as to utilize the rumpkernel while executing the application binary. After packet creation and network config is handled the main fuzzing function is written where a series of steps are followed:
- We call rump_init() to initialize the rumpkernel linked via libraries
- We setup the Client and server IP addresses
- We setup the TUN device by calling the network config functions described above
- We create the packet using the packet creation function utilizing the random buffer passed by the fuzzer and transforming that into a semi-random buffer.
- Pass this forged packet into the network stack of the rumpkernel linked with the application binary by calling rump_sys_write on the TUN device setup.
IPv6:
IPv6 stands for the Internet protocol version 4. It is the successor of the IPv4 protocol. It came into existence in order to overcome the addressing requirements that could not fit in a 32 bit IPv4 address. It is used as a network layer protocol for routing and host to host packet delivery using an addressing scheme called IPv6 Address(A 128 bit address scheme). It also supports almost similar other functions as IPv4 except some things like fragmentation, broadcast(instead uses multicast).
In order to be able to reach these various aspects of the protocol and be able to fuzz it, we went forward with packet creation that took care of basic fields of the IP Header so that it would not get rejected in trivial cases as mentioned before. Hence we went ahead and fixed these fields:
- IP Version: Set it to 0x6 which is a 4 bit value.
- IP Hop Limit: This is an alias for TTL. Set it to a maximum possible value of 255(8 bits).
Other fields were allowed to be populated randomly by fuzzer input. Allowing the payload len value to be randomly populated allowed processing of various “next headers” or ”Extension headers”. Extension headers carry optional Internet Layer information, and are placed between the fixed header and the upper-layer protocol header. The headers form a chain, using the Next Header fields. The Next Header field in the fixed header indicates the type of the first extension header; the Next Header field of the last extension header indicates the type of the upper-layer protocol header in the payload of the packet. A further work can be done to set the value of the next header chain and form packets for multiple scenarios with a combination of various next headers.
UDP:
UDP stands for User Datagram Protocol. It is one of the simplest protocols and is designed to be simple so that it simply carries payload with minimal overhead. It does not have many options except for checksum information and ports in order to demultiplex the packet to the processes.
Since UDP runs at the transport layer and hence is wrapped up in an IP header. Since we do not want to fuzz the IP code section, we form a well formed IP header so that the packet does not get rejected in the IP processing section. We only randomize the UDP header using the fuzzer input. We used previously built out IP packet creation utilities to form the IP header and then use the fuzzer input for UDP header.
In UDP, we fix the following fields:
- UDP Checksum: Set it to zero in order to avoid checksums.
ICMP:
ICMP stands for Internet control message protocol. This protocol is sometimes called a sister protocol of IP protocol and is used as a troubleshooting protocol at the network layer. It is used for major 2 purposes:
- Error messages
- Request-Reply Queries.
ICMP has a lot of options and is quite generic in the sense that it handles a lot of error messages and queries. Although ICMP is generally considered at the network layer, it is actually wrapped inside an IP header, hence it has its own protocol number(= 1). Again similar to UDP, we wrap the ICMP headers inside IP headers, hence we do not randomize the IP header and only the ICMP headers using fuzzer input.
In order to test various ICMP messages and queries, we could not fix values for the type and code fields in the ICMP header since they decide the ICMP message type. Also if we allowed random input, most of the packets would get rejected since the number of options of type and code fields are limited and most other values would discard the packet while processing. Hence we came up with a solution where we deterministically modified the input bits from the fuzzer corresponding to the code and type fields. For the type field we simply took a modulo of the number of types(ICMP_NTYPES macro used here). For the value of code , we had to fix values in a certain range based on the type value set already. This technique allowed us to cover all different ICMP message types via the fuzzer input. We also ensured that the input buffer was not modified completely randomly, since that is a bad practice for a feedback-driven fuzzer like ours. Apart from this we fixed the ICMP Checksum field as well by calculating the checksum using the internet checksum algorithm.
Ethernet:
Ethernet protocol defined by the IEEE 802.3 standard is a widely used data link layer protocol. The ethernet packet called a frame carries an IP(or the network layer protocol) datagram. The header is simple with Link Layer Addresses called MAC address (used for switching at data link layer which is a part of addressing), for source and destination each of 6 octets(=48 bytes) present, followed by a 4 octet Ethertype and QTag field. This is followed by payload and finally the FCS(frame check sequence) which is a four-octet cyclic redundancy check (CRC) that allows detection of corrupted data within the entire frame as received on the receiver side.
In case of Ethernet protocol fuzzing, we had to use a TAP device instead of a TUN device, since the TUN device supports passing an IP packet to the network stack, whereas a TAP device accepts an ethernet frame.
For packet creation, we set the source and destination MAC address and let the payload and ethertype be randomly populated by the fuzzer.
Current Progress and Next steps
The project currently has reached a stage where many major internet family protocols have been covered for fuzzing. As described above a structured approach to fuzzing them have been taken by forming packets based on the internal workings of the protocols. Also as mentioned in the previous post, Rumpkernel environment is being used for fuzzing all these protocols. In order to get better results as compared to raw fuzzing, we have taken these steps. In the next report we shall talk about and compare the coverage of raw fuzzing with our approach.
For the next phase of GSoC, the major focus would be to validate this process of fuzzing by various methods to check the penetration of packets into the network stack as well as the code coverage. Also the code would be made more streamlined and standardized so that it can be extended for adding more protocols even beyond the scope of the GSoC project.